3/4" 100% RUBBER MAT™
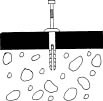
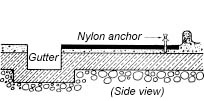
ANCHORING MATS TO EXISTING CONCRETE — For existing barns, anchor mats on top of concrete (make sure platform is clean and smooth). Position bottom end of mat close to gutter edge for extra protection of cow's udders. Lag mat across front end using 3-mat anchors (so mat can be picked up for cleaning, if ever required). Measure 4" from top and side of mat and mark off holes. Use 1/4" masonry bit and drill holes through mat into cement. Drill holes 1/4" deeper than anchor, since dust tends to go back into holes. Insert nylon-anchor body in hole and tap gently until head of anchor body is set tightly against mat (dip anchor body in liquid soap first to make job easier). With several sharp hammer blows, drive nail into nylon-anchor body to expand.
CEMENTING MATS IN NEW CONCRETE — For new free and tie stall barns, mats can be cemented into new concrete. Slope platform 3" to 5". Position bottom end of mat close to gutter edge for extra protection of cow's udders. Provide a 4" border along top end of mat and 8" between mats. The bond between mat and fresh concrete may soon break, but concrete border surrounding each mat will hold it in place. Pour platform to elevation 3/4" below final height and level. Allow one hour for initial set, then install mats. Do not push mat into concrete as this will result in a much harder surface. Pour border around mat and trowel flush with mat surface. Lag mat across bottom end using 3-mat anchors (refer to anchoring instructions in preceding paragraph).
CUTTING MATS FOR A CUSTOM FIT — Mats can be cut with a sharp linoleum knife. Dip knife often into cold (not hot) water for extra lubrication. If you have to notch out for posts, make cuts as close as possible to diameter of pipe. Some installers use a maul and a short length of pipe with a sharpened end to punch out holes for posts. For faster cutting, use a reciprocating portable saw, i.e., Sawzall®.