POLY LINER


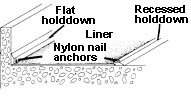
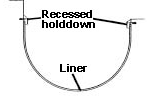
Note: Above installations illustrated with poly holddowns. However, some budget buyers simply unroll liner over limed manger floor; allowing curved, outside surface of roll to face up toward ceiling. They report that after several days, the weight of the feed sitting on top of the curved-liner surface, plus the pressure of the cows pushing down on liner as they eat, plus the suction created between the limed floor and the underside of the liner, will level liner so its flat. They also note that the edges of the liner bite into the cement, preventing feed from creeping under the liner.
- Many farmers claim poly manger liner saves a minimum of 1 lb. of feed per cow per day. If you're throwing feed away, you need a liner — it can pay for itself in as little as 6-months
- Unlike cement; smooth, hard surface won't absorb moisture or feed — helps eliminate bacteria buildup (which causes feed souring, mold and musty odors). Even if water bowls overflow, feed will stay fresher longer. Unlike porous cement, glasslike liner surface doesn't contain a "starter bed" of bacteria. Helps eliminate fly breeding/feeding
- Cows eat and milk more, since feed stays fresher — and because smooth poly doesn't hurt cows tongues like rough cement and protruding rocks
- High-density poly won't pit and wear like cement — enables cows to lick the feeding surface clean (increases grain consumption of cows that wouldn't lick feed out of rough, rocky cement) — protects cement floors
- Prevents loss of expensive protein, mineral and vitamin additives, which imbed and sour in cement pores and cracks
- Cuts cleaning time — ends scraping — sweeps easily with a light pushbroom. Because feed doesn't sour, cows clean up their feed and a heavy scraper is not needed
- Low-cost way to make old mangers better than new
- Much less expensive and easier to install than ceramic tile or epoxy resurfacers
- Liner can be driven over with cart without cracking
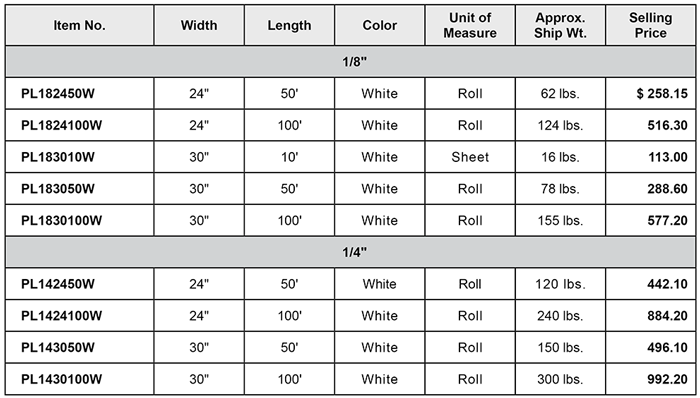
Click the image below to enlarge

Click here to download this chart
- "Condition" poly at 45° or above (the hotter the better), for 24-hours prior to installation, to minimize future expansion. A heated milkhouse or direct sunlight works good. Elevate liner off cold floor/ground and unroll for quicker heat absorption. Weight-down liner to prevent it from rolling back up. Allowing the liner time to "relax" vs wrestling with a "springy" roll, will save you installation time.
- Predrill poly holddowns (3/8" holes at 12" intervals, starting 1" from end).
- If holddowns not used, refer to "Note" above.
- Thoroughly clean old feed, dirt and moisture from manger to prevent musty odors.
- If 1/8" liner is used, fill in manger holes and rough spots with ready-to-mix concrete, sand, or lime; to provide flat, underlying support. Many farmers will fill in holes, even if 1/4" liner is used, to prevent water from ponding under liner and possibly creating musty odors, or if liner is to be driven over. Some farmers drill 3/8" to 3/4" holes in low-lying portions of manger floor and under water bowls, straight down to gravel base, to permit drainage (refill holes with sand to aid drainage).
- Unroll liner and turn over so inside of roll faces up toward ceiling. Position liner in manger so joints, if any, are away from drinking cups and are between cows (you don't want cows to lick over joints).
- On flat mangers, mount flat holddown flush over liner as illustrated above and lag holddown to curb, using an 1/4" dia. x 2" L nylon nail anchors (1-1/2" L if cement is sound). See "Nylon Anchor" instructions. Also lag where cement is uneven for a tight fit. Butt ends of holddowns together (because of smaller temperature variations in barn), to prevent feed from accumulating in cracks. Mount recessed holddown over liner. Reposition liner under curb and feed-alley holddowns to allow for expansion/contraction (see "Expansion/Contraction" instructions). Lag same as curb holddown.
